How to Delete or Hide the Recycle Bin in Windows 7, 8, or 10
ll of you are very much familiar about Windows Recycle Bin, In your computer when you accidentally erase any file then you utterly go to recycle bin and restore that file and relapse back in your internal storage. You all must be using this from very long time but what if you don’t want to use this feature as sometimes you want to permanently delete the files and don’t to see them in the Recycle Bin. Actually, these files are easily get pointed out. Yesterday my little brother was using his laptop and when I ask him for the laptop he quickly deleted some files but that was without using the shift button I was confident I can get it in the recycle bin. But I was surprised as there was nothing in the recycle bin even the Recycle Bin was not there on the desktop. even after accessing the recycle bin from the explorer I found nothing. So I ask him that how he did that then he told me the method by which he was able to disable the Recycle Bin in his WIndows so that files can get permanently deleted. That made me realize that y brother is smart enough to do such trick things and then I decide to write the same guide for my techviral visitors so that they can also get to know about the method that they can use to disable the recycle Binn and can permanently delete files. So have a look at complete guide discussed below to proceed.

The method is quite simple and straight and you just need to follow the step by step methods to proceed so that you can disable the feature and can hide the recycle bin from the windows desktop also.
1) Disabling the Recycle Bin So That All Files Can Get Permanently Deleted
In this, you will be disabling the recycle bin option in your Windows so that OS can skip the recycle bin and files can directly get deleted from the Windows.
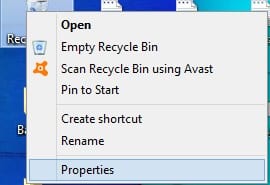
- First of all, you need to disable the recycle bin usage functionality in your Windows PC and for that, you just need to right-click on the Recycle bin icon on your desktop and then choose the option “properties“.
- Now a dialog box will appear where you will see two radio buttons and there you need to tick on the “Don’t move files to the Recycle Bin. Remove files immediately when deleted.”
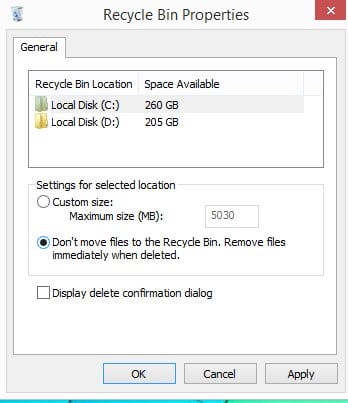
- Now simply click on the apply and then ok and you will see dialog box will get disappear and settings will e saved. You can test one file deletion and that will go right away deleted from your Windows.
2)Removing the Recycle Bin From Desktop So That No One Can Access It
Now you need to remove the icon of Recycle Bin from the Windows Desktop as anyone can directly access it and you may not want that thing to happen so below are the steps that you need to follow to make the recycle bin icon hide from the desktop screen.
- For this in your Windows 10 pc you need to browse to the option “Personalization -> Themes -> Desktop icon settings” and this will open the desktop icons that are permanently there in the desktop. And you will also see the recycle bin on there.
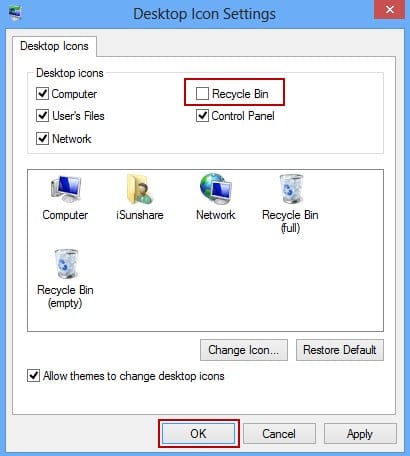
Simply uncheck the icon and save the settings and exit the dialog box and now you will see that the recycle bin will not be there in the desktop so no one can come and access directly recycle bin from your desktop.
Accessing the Recycle Bin After Disabling It From Desktop
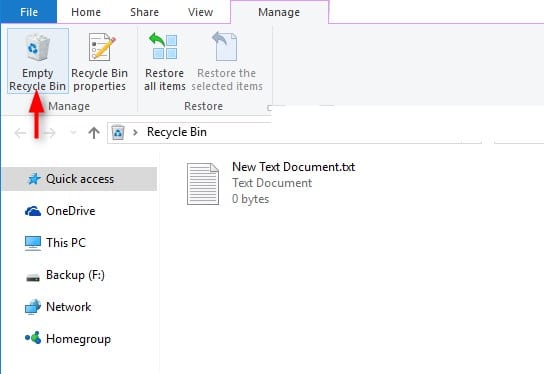
After disabling the recycle bin from Desktop most of the users don’t know how they can access the recycle bin. So for that, you simply need to open the explorer of your windows and simply click on the recycle bin icon at the left corner, if that is not there simply type recycle bin in the in the location bar and click enter. You will now see the recycle bin directory of your windows PC
How to Delete or Hide the Recycle Bin in Windows 7, 8, or 10
![How to Delete or Hide the Recycle Bin in Windows 7, 8, or 10]() Reviewed by MNG
on
April 18, 2018
Rating:
Reviewed by MNG
on
April 18, 2018
Rating:


No comments